
As I said in that discussion about parallel parking, however you look at it all it boils down to is reversing into a space behind another vehicle in a reverse ‘S’ path (or an ‘S’ path on the right side of the road, so USA readers bear that in mind). However, success, failure, and reproducibility are a direct function of the actual method used.
When I first became an instructor I tried various methods based on the ones my trainers had taught me. However, I wasn’t happy with any of them because they were so unreliable. Coming from a scientific background I wanted something that was as precise as possible, because it would then be reproducible – and reproducibility is what catches many learners out when they are trying to master this manoeuvre.
This is the method I developed as a result. Reversing into the target space an ‘S’ path is variable unless you set boundaries. This is why many of those other methods yield such variable results, because they are based on judgement, and most learner drivers don’t have that skill developed to a high enough level. This one doesn’t require such skills, and works based on fixed positions.
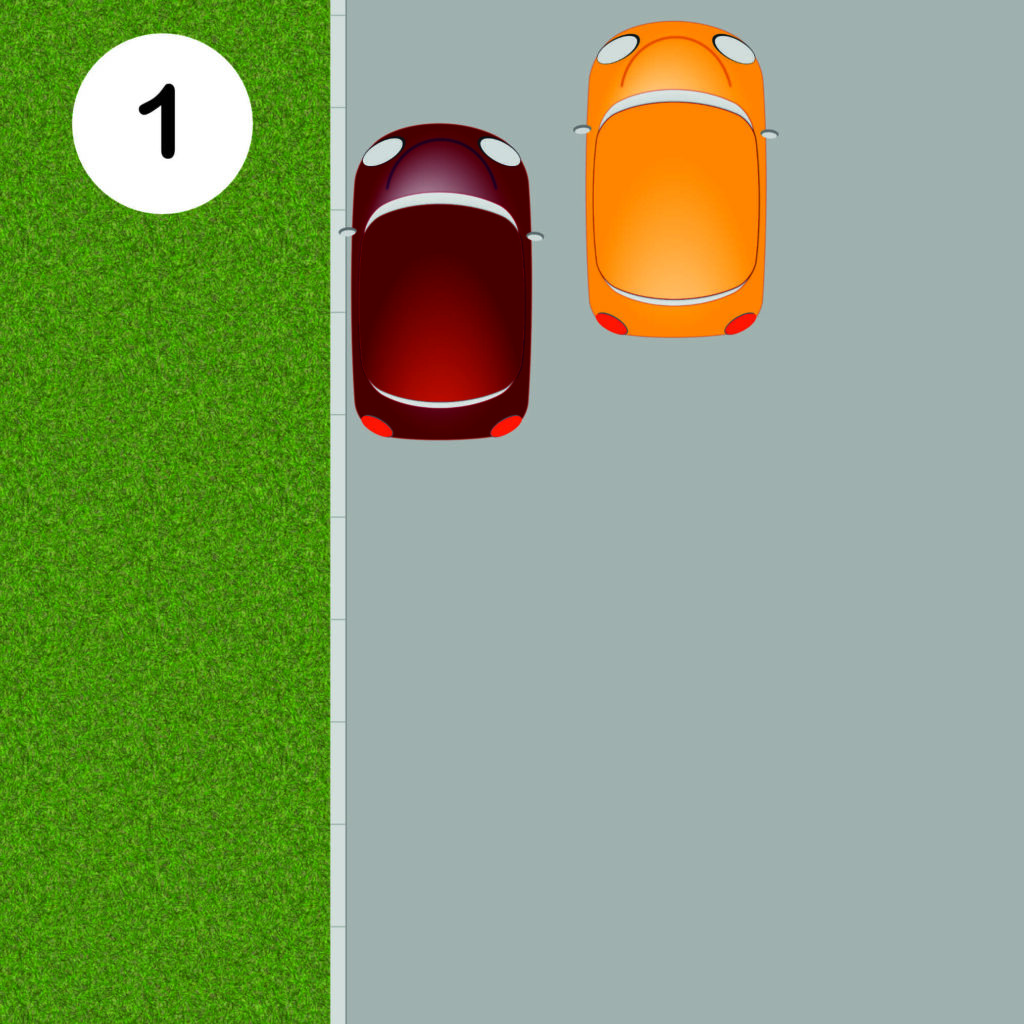
Step 1 is to drive up alongside the target vehicle, slightly ahead of it, and about ½ to ¾ metre away from it.
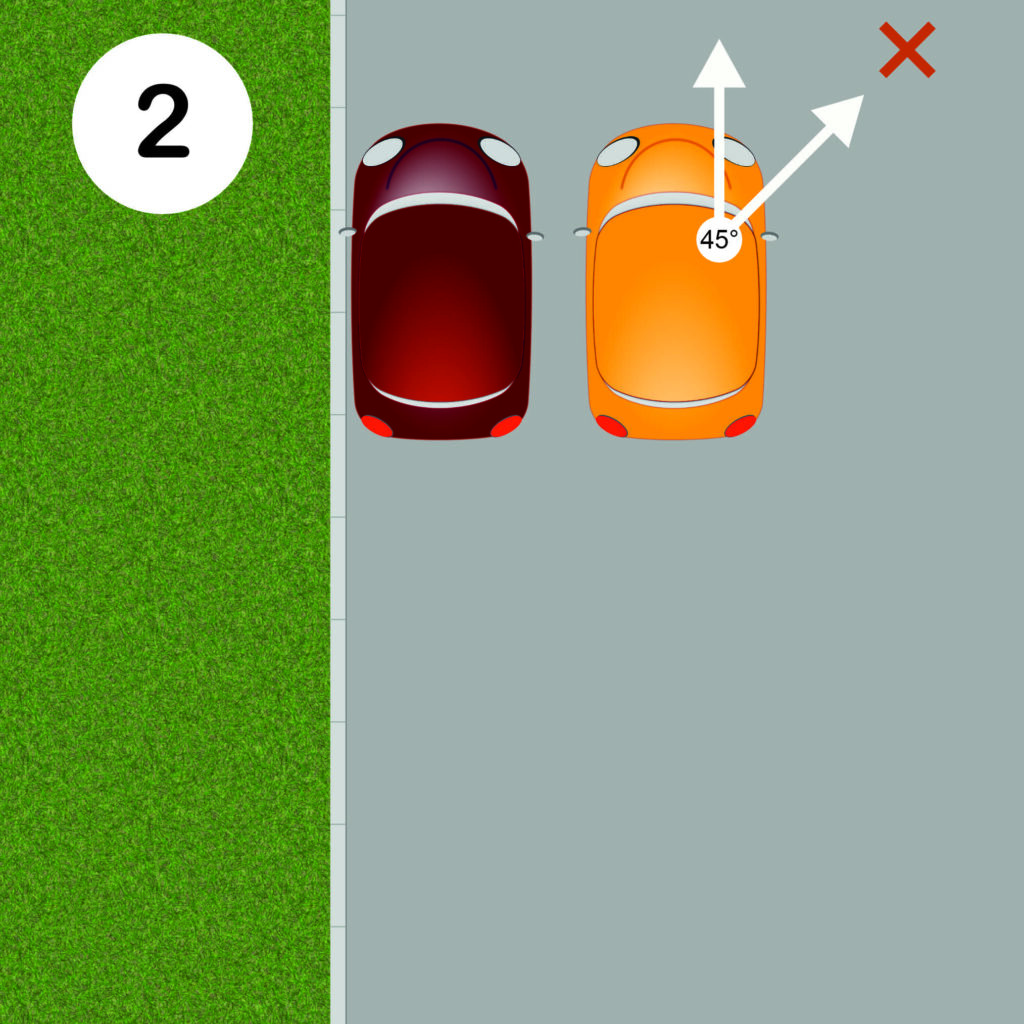
Step 2 is to reverse back until the back of your vehicle is level with the back of the target. The reason you do it this way instead of trying to start level to begin with is that you will need to look behind you. If you do that while you’re are still moving forward, you could make contact with the target car. Once you have stopped, work out where you need to aim – you want to pick something at about 45°. On the diagrams, it is the red ‘X’.
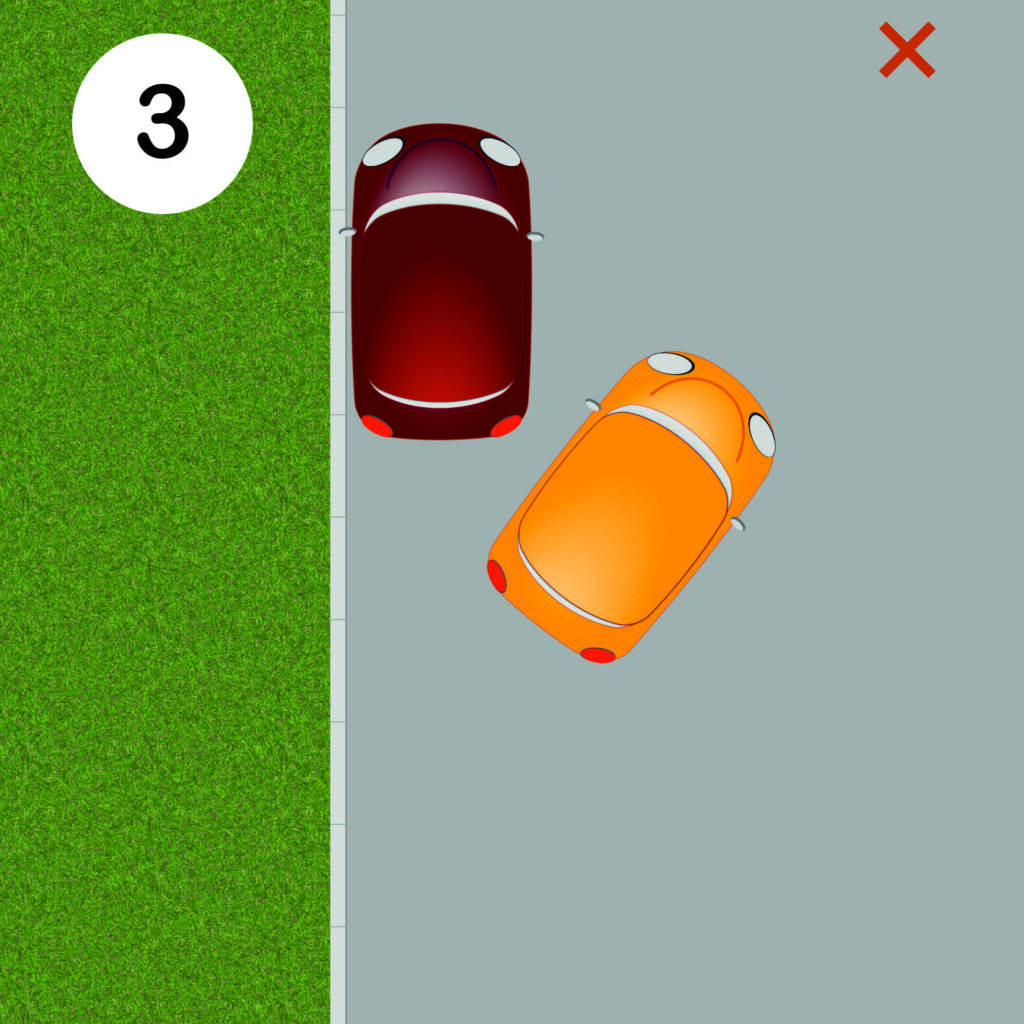
Step 3 is to steer full lock to the left and move backwards until the car is aiming at the 45° point you chose (the red ‘X’). The actual angle you go for isn’t super-critical, but getting the same angle consistently each time is.
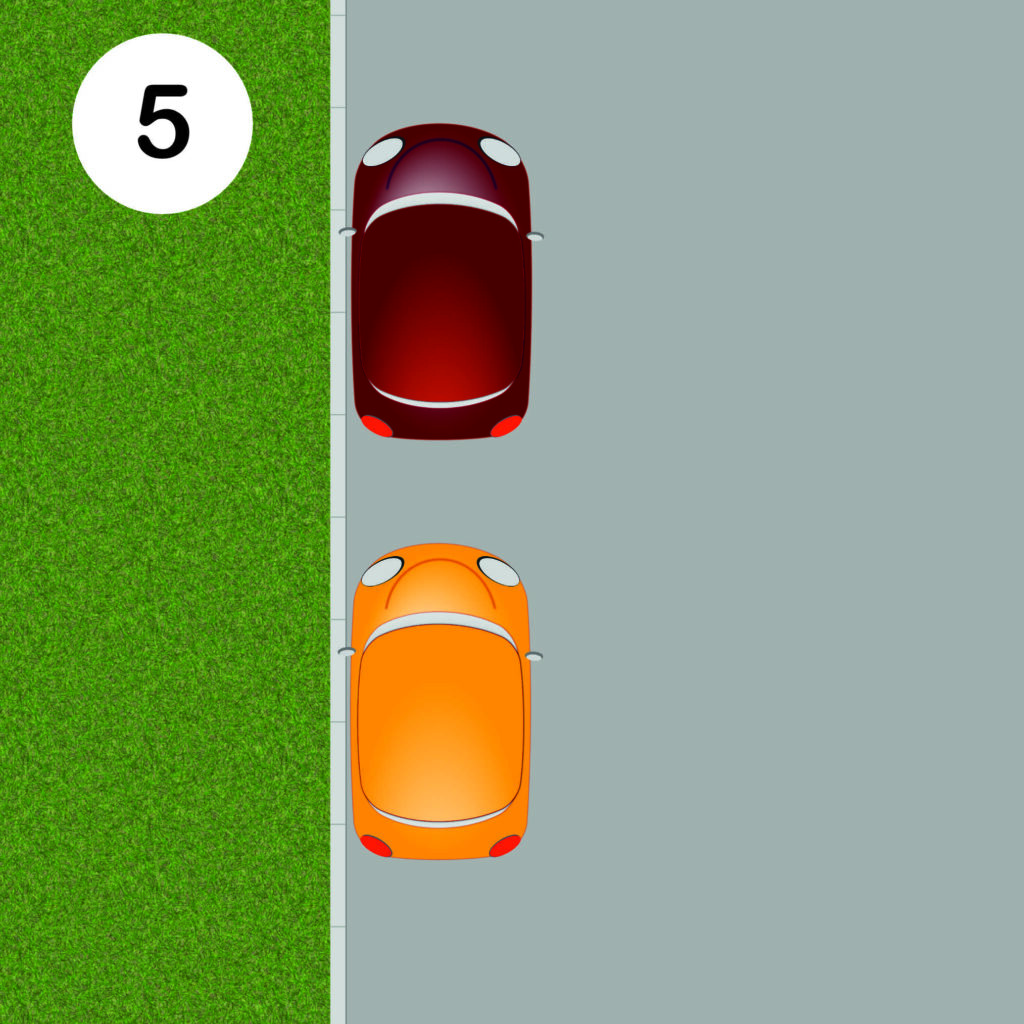
Step 4 is to straighten the wheels and reverse back in a straight line towards the kerb. Stop when your rear nearside wheel is about ½ metre away from the kerb. This is the second vital key position.
Step 5 is to steer full lock to the right and reverse back until you are parallel with the kerb. Once you are, stop and straighten your wheels.
The method is very simple. Summarising the stages, you have:
- stop slightly ahead of the target car
- level up the back ends
- use full lock to turn about 45° from your original position
- straighten the wheels and reverse back to the kerb
- use full lock to swing back in, then straighten the wheels
Once you’re in, and parallel with the kerb, just stop. You don’t need to reverse back any further (which might take you too far back, so you’d get faulted), nor do you need to move forward to close the gap. If you follow the method reasonably closely, you will be in the right place.
The real trick is being able to get to a consistent angle each time and to judge the distance from the kerb reliably – those two things work together and are critical. Not being able to do these is what makes any method unreliable. It’s like baking a cake. Use the correct quantities of your ingredients and you get a cake at the end. Use the wrong quantities and you get a mess.
A useful tip. When you pick your red ‘X’ (45°) position, try to pick something as far away as possible. Go for a house feature, such as a chimney, or even a distant tree. Avoid using a nearer point, such as a car parked on the other side of the road if there are more distant objects available.
How far ahead of the target car should I stop?
It doesn’t really matter as long as the back end of your car is further forward than the back end of the target. Just don’t overdo it and end up completely beyond the target vehicle. As a rough guide when using another car, make your wing mirrors level with the front of the target car’s bonnet (or its boot if it is facing the other way). Obviously, a lorry or van is much bigger, so you’ll have to judge for yourself.
How can I tell when I’m level with the back of the other car?
Your instructor will be able to tell you when to stop in the right place. At that point, look out of the nearside rear passenger window and look where the target car’s back end appears. Use that as your reference in future.
Do I have to be exactly level with the other car?
No, not exactly. Just near enough. If you’re much too far forwards you might clip the other car when you swing in. If you’re much too far back you’ll just finish further back than you need to be. But a bit either way shouldn’t matter.
How can I work out where 45° is?
Don’t get too hung up on the number. It is only relevant for picking something to aim at. As long as you can pick more or less 45° – and get it about the same each time – the method will work. You may find that you can judge it by eye (I demonstrate to pupils how I can do it with my eyes closed, but I have more experience than them and the majority cannot do it that way). So a reference often helps.
To get a reference, park at the side of the road and have your instructor point out something – a tree, a chimney stack, a window on a house, etc. – which is at about 45° to your current position. Look at where that object is in relation to your car and head position – maybe the middle of your door mirror, the corner of the windscreen, etc. That becomes your reference point in future. So when you’re ready to angle the car, check what your reference point lines up with (a tree, a chimney, and so on), and then go back slowly until you’re pointing the car straight at it.
Do I have choose exactly 45°?
No, but try to be reasonably close to it. When you move, the angle reduces slightly anyway. You don’t want to go too far past whatever you have picked to aim at, that’s all. The only critical part is to make sure you get more or less the same angle each time. If your angle varies, the rest of the procedure will, too.
For most pupils – many of whom don’t understand what 45° actually means – I just call it the ‘magic angle’, and keep numbers out of it altogether and stress the reference point I help them establish.
How do I know when I’m the right distance away from the kerb?
Get your instructor to stop you in the right place, then use your nearside door mirror to show you where the kerb is. In my car, if the door mirror is angled to show about a thumb’s width underneath the door handle before starting the manoeuvre, then the car will be the correct distance from the kerb just before you lose sight of the road tarmac while you’re doing it.
Am I allowed to adjust my mirrors on my test?
Of course you are. Just try to avoid doing it when you are in the middle of the manoeuvre because you’ll likely be blocking the road, and if you delay other road users unnecessarily then that can lead to faults being recorded. Adjust the mirror before you begin (but if you forget, adjust them quickly and continue).
Is it important to stop the same distance away from the kerb each time?
Yes. If you go too far back you’ll hit the kerb as you turn in, and if you don’t go far enough then you’ll finish wide once you’re straight. If your kerb distance varies, the result of the manoeuvre will vary.
Can I adjust my final position?
Yes – but only do it if you really need to. If you follow the method closely, you won’t need to adjust your position at all. Use your lessons to understand what is acceptable and what isn’t. You’re allowed to be surprisingly far back – at least one whole length of your vehicle – before it becomes too far back. If you’re less than that, don’t fiddle.
The same applies with how far from the kerb you are. If you finish brushing the kerb, you can’t fix that – you’ve already brushed it – but it will only be marked as a driver fault at worst. Just leave it be. You can be up to around 30cm (1 foot) away from the kerb – learn what that looks like in the mirror and don’t fiddle unless you have to.
What if I hit the kerb on my test?
Touching the kerb during this manoeuvre is not usually a serious fault. At worst, it is a driver fault (and it might not be marked at all if you quickly and safely correct it). Hitting the kerb hard and fast is likely to be a serious fault, and mounting the pavement almost certainly will be. Also be aware of any lamp posts or other street furniture – if you get too close to those, touching the kerb might be considered more of an issue by the examiner.
If you’ve followed the method reasonably well, you will touch the kerb when you are almost straight. If this happens, you will have enough room in front to get full lock on, move forward slightly until you are straight, then straighten up and reverse back by an equally slight amount to complete the manoeuvre. Don’t move too close to the target vehicle when you do this – that can be marked as a serious fault.
If you are still at a pronounced angle when you touch the kerb, then you have messed up the method at Stage 3 or 4, and won’t have enough space in front to make the slight adjustment mentioned above. The best option is to go back to your angle by driving forward and try that stage again.
Although you’re not supposed to do it, you might consider starting the whole manoeuvre again. I’ve known people do that and get away with it, but I know others who didn’t. It’s your decision.
Remember that with any adjustments, you will also need to add safety checks and observations. This often catches people out as they start to panic.
Is it OK to dry steer?
Yes.
Do I need to reverse back any further once I’m next to, and parallel with, the kerb?
No. The whole point of the manoeuvre is to complete it within two of your own car lengths from the back of the target vehicle (i.e in the smallest space possible). Once you’re in, reversing back any further is pointless and could mean that you end up too far back.
If I’m too far back, can I drive forwards to correct it?
Remember that in the real world there will be another car behind you. You’re only as good as the furthest distance back you travel. The examiner will be assessing you on that farthest position, not the closest. If you can follow this method consistently you won’t be too far back and there will be nothing to correct.
If you feel you need to do it, just keep your fingers crossed at the end of your test.
You haven’t mentioned observations
You need to be aware of other road users, just like with all the other manoeuvres, and the examiner will be watching to make sure you’re looking for them. As a rough guide, look all around before each stage of the procedure at the very least, and check as necessary while you are moving. This is especially important if you end up trying to adjust your position, because you probably won’t have been taught any specific procedure for it, and you might forget to check for other vehicles and pedestrians if you are panicking.
Don’t precise angles and distances make this method too complicated?
As I said previously, other methods are extremely unreliable since they often rely on judgement, and you only get one chance to get it right on your driving test. The more precise you are with your method, the more reproducible it will be.
When you strip away the details, everyone parallel parks in the same way – a backwards ‘S’ (in the UK) into a gap. My method just makes sure the ‘S’ is the same size and shape each time for those who are doing this at the start of their driving lifetimes. The actual numbers don’t matter too much, but being consistent with positions and general angles does.
Will I fail my test if I can’t parallel park?
Yes – if the examiner asks you to do it, and you can’t. The same applies to all the manoeuvres you might be asked to do.
What about doing it on the right-hand side of the road?
I’m getting increased hits from readers in the USA. Quite simply, the method still works. You just have to get to a consistent angle (45° is ideal) to your left, and figure out what to look for when you’re the right distance away from the kerb (using your right mirror). Once you have a reliable angle and reliable distance from the kerb, you’re there.
Doing it on the right is easier in the UK, since the driver sits on the right side of the car, and so can see the kerb without using the mirror in most cases.
Remember that if you vary your angle, or vary your distance away from the kerb, the end result changes. For example, if you go much beyond 45° then you’ll need to stop further away from the kerb.