Originally posted in 2009, updated periodically.
I noticed the search term ‘adi clutch explained’ used to find the blog.
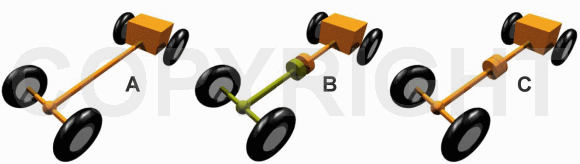
In my lesson plans I have various drawings I can use to explain parts of the car and driving. This is the one I use when I’m explaining the clutch on the Controls lesson.
Basically, in diagram A (if there was no clutch), as soon as the engine starts (and the car is in gear) the drive shaft starts trying to turn the wheels. This would either make the car move forward or make it to stall if it was still in gear and you tried to stop it with the brakes.
In diagram B (with the clutch pedal fully down), the drive shaft is broken and each end of it has a clutch plate – which can be thought of as being like two flat discs coated in hard-wearing material. The actual construction of a real clutch is far more complex, but this simplification still holds true. With the clutch pedal is pushed down, the two plates are pulled apart so that the engine is effectively disconnected from the gearbox and wheels. The plate connected to the engine (in orange) is spinning at several hundred rpm when idling (I point out the rev counter at this stage), but the one connected to the gearbox/wheels (green) is either stationary, or only driven by the movement of the car’s wheels.
In diagram C (clutch pedal fully up), the two plates are forced hard together as if there was no break in the drive shaft at all.
I then explain that if the clutch is lifted gently, the point where the plates just begin to touch is called ‘the bite point ‘, and that this is the secret to controlled driving. At the bite point, some of the energy from the engine is transferred to the wheels. How much is transferred depends on how much the plates are touching, and with good control you can inch forward on an upward slope, roll back, and even hold it dead still without stalling. If you can hold it still, you can literally do anything – it is ultimately the Secret to Driving. I demonstrate this with no gas and then get them to do it, moving off in the process (also with no gas) – it gets them involved quickly instead of just listening to an hour of lecturing. When we then look at moving off and stopping properly, they see how much more robust it is with gas.
I have an exercise where I get them driving up a fairly steep hill in a quiet estate near me, then take their foot off the gas and depress the clutch until the car rolls to a stop, then quickly find the gas/bite to hold it stationary on the hill without stalling. After a bit of practice they can do it without any rollback at all.
It’s amazing the effect this has on people who stall a lot. If I believe what pupils who have taken lessons before tell me, not many of them have had this explained in any detail (a pupil once told me they just had to pick it up from driving around).
One piece of advice: don’t be an anorak and try to explain the detailed workings of a genuine clutch. You’ll confuse most of your pupils rather than impress them.